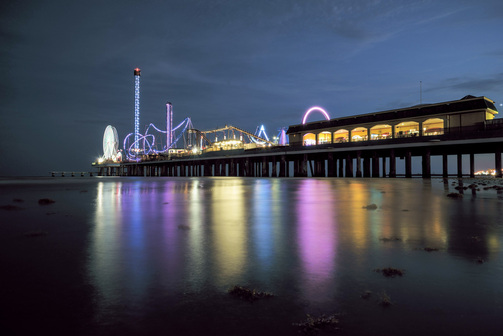
This was taken at the Pleasure Pier in Galveston, Texas. During the day, the place is kind of boring photographically, but you can make it interesting right after sunset. When dark, you can really slow down the shutter speed to smooth out the waves and make the scene serene. I set my tripod as low as I can without getting the lens wet and shot this picture at 30 sec. In Galveston, the sun sets on the bay side. If you want the sun in the pic, you have to make up early in the morning. (Sony A7R, Zeiss 24-70mm FE at 24, ISO = 100, f/13, 30 sec) |
0 Comments
Wide angle lenses are fun. This was taken with my 16-35 mm Nikkor lens at 16 mm. A wide angle make the picture being sucked in the middle. If you have a great cloud scape, it makes it dramatic. It keeps your eyes in the middle of the picture and that's what you want. Longer you can make people look at your picture, better the composition.
Anyone can take this pic. This was taken at the Great Prismatic Spring at Yellowstone NP. It is accessible by a car. No hiking required. It's very close to the infamous Old Faithful Geyser on the west side of the park. (Nikon D800E, Nikkor 16-35 mm at 16 mm, f/11, 1/500 sec, ISO = 200, handheld) When the sun sets, it's time to pack and go back to your hotel/tent/cabin? No, it's time to shoot more. Star trail photography is easy. For this pic, I set my camera at 30 sec exposure and f/2.8. Yes, you should set everything manual. I manual-focused a little shy of infinity. You have to play with ISO to find the best exposure with the setting. Once you are satisfied with the exposure (make sure to check the actual picture and histogram), then you can start the time lapse procedure. First you need to turn off the slow shutter noise reduction so that there is no time lag. Then, set the shutter to the continuous mode. Then finally, shoot with a shutter release cable locked. Because it's locked and set continuous, the shutter automatically releases every 30 seconds. For this pic, I shot 5 continuous 30 second shot.
Now glue all those pics in Photoshop. Open all the pics in layers and combine with "lighter" setting. (D800E, Nikkor 70-200 f/2.8 at 70mm, 30 sec, ISO = 400) Every picture you see in the internet on Mormon Row in Grand Teton National Park is from the left side so that the old cabin lines up with the Grand Teton (the tallest of the Tetons). Just to make it little different from all the other pictures, I took this shot from the right side. Off course, I lose most of the Tetons but there was a nice cloud scape to fill the left upper corner of the picture. The Tetons are on the west side of the park so that all the good lighting is in the morning. This one however was taken during the sunset with a graduated filter. Because I was facing more south (taking the pic from the right side), I was not directly facing the sun. (Nikon D800E, Nikkor 16-35mm at 17 mm, f/11, 1/50, ISO = 200, WB = auto, Taken JPEG, handheld with graduated filter)
It's so easy to get a good shot nowadays. Your camera does a lot of things for you. All you have to do is to bring the camera to the right place and get a decent composition (with high MPs, you can even crop them later). I took this shot with the in-camera HDR function, handheld. No graduation filter or post processing. No tripod for bracketing for HDR. It kind of takes fun out of it but saves a lot of time. Not a master piece but decent. (Sony A7, Zeiss 24-70mm FE at 24 mm. f/13, 1/60, ISO 640, not sure how shutter speed and ISO listed if multiple exposures are taken for in-camera HDR)
Good shots can be hard-to-get shots. Only those who worked for it deserve the shot. So many things other than right equipment and technique are needed to get this one shot. Here are some things that are needed to get this panoramic shot:
1) Plane ticket, rental car, lift ticket: Why some photographs are so expensive? Well, a lot of times there are a lot of money spent by a photographer to get to the place. Some photographers camp out for days to get that one awesome shot. You can have the best camera and lens, but you have to get there to take the great shot. 2) You just have to get there: I took this shot at the highest peak of the Canyons in Park City. There is multiple transfers of the ski lifts to get there. This particular lift takes you to the peak of the mountain where only expert skiers are allowed to go. The only way down is "black diamond" (expert) slopes. Not only you need good skills for photography, but you also need to be an expert in skiing to get this shot. 3) Sacrificing safety: I don't recommend this, but some good views come with risks. Sometimes safety has to be sacrificed to get that great view. Here, I'm on a steep slope on the edge of a cliff. One wrong step....I done. Warning: when you look into the viewfinder, you lose your balance sense. Make sure that you have a safe stance before you look into the viewfinder. 4) Weather sealed equipment: Some equipments are not weather sealed. You need a weather sealed equipment in harsh environment. Extreme high/low temperature, rain, mist, dust are things that can ruin your camera/lens. Make sure to have weather sealed stuff in these situations. 5) Luck: Especially when you try to take a shot at hard-to-reach places, you don't get to be there too often or too long. A lot of professional photographers camp at places for a long time so that they can be there at a right moment, but for us, we have to rely on luck to have good weather and lighting. Some things can be controlled but some things can't be controlled. Do your homework, pick the best time to visit the "hard-to-get" places. (Sony A7, Zeiss Sonnar FE 1,8/55 ZA, ISO = 100, 1/500, f/9) I took this pic with my old Nikon D90. As you can see, it looks as nice as pictures I take with my D800E. For websites, 10-12 MP with APC sized sensor is enough. Took RAW and did some king of post processing that I don't remember. I know it's not a HDR pic because it was still a single RAW file before I converted to JPEG for this website. (Nikon D90, Nikkor 18-200mm at 20mm. ISO=200. f/13)
There are so many softwares that have presets to make your modern pics old. I love shooting with a film camera because it gives you the typical look. But, nowadays, it's so easy to produce the film look with post-processing. Here all I did was dial down the saturation and applied grain (noise) to the pic. (Nikon D7000, Sigma 150-500mm f/5.0-6.3 at 300mm, f/6, 1/250, ISO = 100, post-processing with Lightroom 4).
I took this pic in Galveston, Tx. It really doesn't have to be in Galveston, in fact. All you need is a nice sunset and few palm trees. Nice sunset comes from good timing and little bit of clouds. You can play with the white balance or post-processing to increase the warmth. Some camera even comes with a sunset setting.
The trees are silhouetted because the camera is adjusting the exposure to the bright sky. Sometimes you have to adjust the exposure manually to darken the picture to blacken the silhouette. I cropped out the top third to cutout the sky with not much action so that the picture looks more balanced. (Nikon D90, Nikkor 18-200mm f/3.5-5.6 at 62mm f/4.8, 1/160, handheld, ISO = 800) Just got my Sony a7, the full frame mirrorless camera. Much easier to carry when compared to my D800E with its lenses. AF is as good as my DSLR. But, the problem is selection of lenses is limited still.
One of the easiest way to shoot a good pic is to get a hotel with a good view. You can spend a lot of time setting up your camera, etc. Do your research before booking your hotel room. I shot this with "in-camera HDR" mode. It was handheld and got as close as possible to the window to reduce glare. This was taken from a hotel room of Hyatt on Riverwalk. (Sony a7, FE28-70mm f/3.5-5.6OSS at 34mm f/4.0 at 1/60) |
Archive
November 2016
Categories
All
|